 |
|
|
|
|
|
| If
it werent for Virtual
Indian, and an invitation from Moen, I wouldnt be sitting here writing
this epistle for Hawaii's only 1946 Indian Chief. Literally, and figuratively.
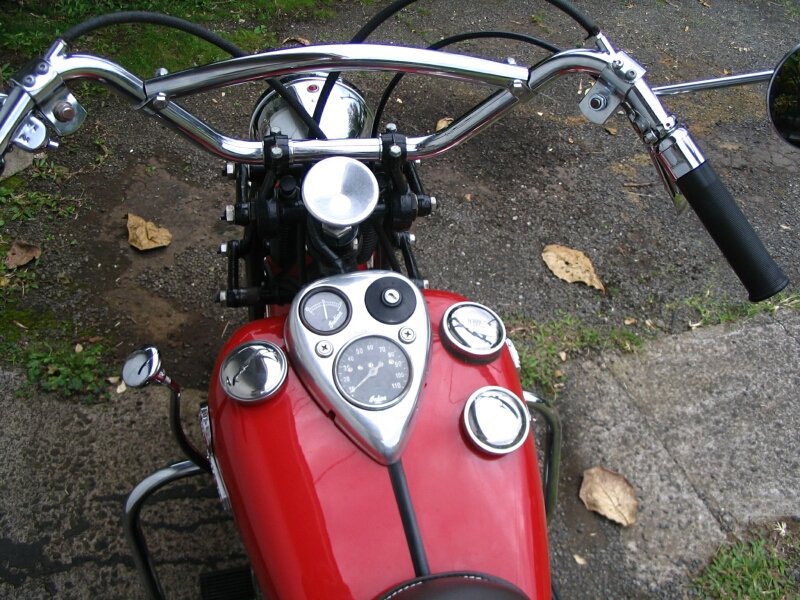
It started with a call from one of my students in Buffalo, New York. That call ended up with my purchase of a newly restored Indian Motorcycle. All my life I wanted an Indian, so after 45 years of riding on at least 40 motorcycles brands, some that most people have never heard of, it landed on my doorstep. Landed on my doorstep. Not in your life was it that easy. Had no idea how to buy something off eBay but that is where it was listed. Seems some auctioneer got it from a closed new Indian shop. There was about a mile of B.S. from the auctioneer, but I found the guy who had it before him (6 phone calls later). He was full of even more B.S. but I did find out who originally owned it. I called him, and boy was he mad. He didnt really want to sell it, but wanted to trade it in for a new Indian!!!!! He had a professional restoration started, the remarkable Markeys Indian Services in PA went through the motor parts (9 phone calls and counting). Anyhoo, the job was finished by the auctioneer hiring a local chopper shop to assemble it. They tried to do their best but - well well talk about that later. I live in Honolulu, Hawaii. About 5,000 miles from this motorcycle. Half way to China, literally 2,700 miles of ocean to any landmass of any kind. So I started calling for a shipper and wound up with the worst company I have ever dealt with. The owner nearly lost the bike sale for me insulting the auctioneer. And thats pretty hard to do. Needless to say it was a horror story, the bike was lost for a while, damaged a wee bit on crating and a box of parts got separated from it in New York city. Nnneeewww YYYooorrk city! Isnt that in the wrong direction? One month later it landed at the Honolulu harbor. Hard. We popped the top off the crate and every single man in that yard come over and oohhd and ahhd. Oh baby! A few dings, a u-haul flatbed trailer, an adventure with a drunk forklift operator and I was on my way to a friends house. Got it out of crate on the truck, rolled it down the ramp and it dawned on me. I was so excited buying this bike I forgot to get any usable info on it. In fact, I didnt really even know how to start it up other than the obvious. Turn on the key, kick the bejesus out of it. Oh laugh now all of you! Finally I went to the Internet. Found an obscure list of vintage Indian proponents, joined up and started asking some of the dumbest questions you can imagine. Uh, how do you start an Indian? How do you shift it, which way does the shift pattern work? Why do both handlebar grips move? Got a flood of answers, great answers, kindly people. Even called up Mr. Breeding and got some great advice .practice your panic stops! Never a truer word. Had to get going first. |

Steve on 346 - dream of a lifetime realized
|
| I
have never seen a starting the motorcycle list of to-dos this long or
complicated. Well other than time in a bush plane
in the Alaskan wilderness. There were up to 11 steps, to start it
and go down the road. Everyone had their own variation of the recipe. But
miss one part, you'll start all over again. After oxygen, a beer and making
my friend try it for a while - I was able to kickstart that wonderful flathead
engine. I may never walk again you know what I mean.
1st friend - Uh, is that engine supposed to be this noisy? 2nd Friend is it supposed to shake that much? Girlfriend whats all that black smoke out the back? Me Im in love and awe. Get on the bike - stall it. Kick it. Stall it. Ad infinitum. Finally - the end of the driveway - Got it now. I wonder if they all leak gas out the carb like this when they idle? Only 14 miles up over the volcano and through the tunnels, and well be home. Hm. These brakes were either designed for appearances sake or they could use some adjustment. My flight training comes in handy at these times, always looking for an alternate landing site. SO THERE WE WERE. Going down the highway, girlfriend behind me in her van, wind ripping at me, vibrations every where, noise, smoke this is a by-god-mo-tor-cycle! Got it home. How fast were we going? I figured about 85 - 112. 30 she said. Didnt you hear all the cars honking at us to get out of the way? Hell no, I was riding my INDIAN mo-tor-cycle and could not heed such miniscule botherings. "Steve" Ute says (ootah - it's a German girls name) "when I was behind you in the car going through the tunnels?" yeah? "That is the loudest motorcycle I have ever heard". Ute is an unknown supermodel from Germany, with a masters degree in business. We share a life here in Hawaii. Me? Im a crusty old Irish martial arts Professor. She deserves special mention. She loves my motorcycles. How much? When I ran out of gas on the Chief for the first time (of several) (like any of you haven't ..) She bailed off the back, in her designer jeans, designer boots and designer T-shirt, and pushed me to a gas station. She's a keeper. The best description Ive come up with for taking off on a 1946 Indian Chief is akin to an organ player up there in the big church organ pit. With your head on a swivel, both hands, and both feet have something to accomplish in a well orchestrated symphony of timing and motion. It couldnt get much more fun! Stopping? Must be why they put the great big handle looking thingy in front of the fender. Damn those fenders are solid, I think I loosened a filling. Ill replace the wood on that garage wall later when I master this. (we did fix the brakes eventually). After a few more
weeks of asking dumb questions on the VI list, it dawned on me what treasures
I had at my fingertips. I had the world's best motorcycle.
I had access to a list of people who are some of the most intelligent people
in their fields AND in minute detail all the mysteries of the Indian.
There are even some crazy people on the list. I'm now one of them.
What a gold mine. How could it get any better than that. So I started mining
for gold. And got it.
|

Not on "the List" yet? Click photo and join up!
|
| Part
2
I only have one rule for my Indian. Ride it like you stole it, and only bolt things on it that can be put back the way they were. Ok two rules. No cutting, welding, sawing, or changing anything that's older than me. ****** Everything you are going to read from here on was done as a bolt on job, with a $39 set of Sears wrenches and sockets, a hack saw, electric drill, a hammer and a set of steel files. This is the honest truth. ******** Don't ask why. Let's get to cooking on some little fixits. Couldn't be too many it's a "restored" bike and the paint is real shiny. Must be so. First job that I felt I could handle were the brakes. Expanding shoes how hard could it be? You need an allen wrench to take off the hub? It has a hub? I'll be darned it has a hub on the back too. I hope it isn't missing a "hub cap", hehe. First discovery - The nuts on the hub are different sizes. In fact some are bolts. I know this because I have one single one on the back, that is a different size than the other ones on the back - and they are different than the ones on the front. Guess I'll need 3 hub wrenches. Okay bolts out let's get that hub off. Ain't budging, and it is not going to in this lifetim in that position. Back to the VI list. "oh yeah happens all the time here's what we do...." I still couldn't get it off so I took the entire wheel out. Getting that wheel out of the fender well, disconnecting the brake, etc. 1 hour. Get a flat on the road and you are going to change it with your handy hub wrench set while on the center stand that no one seems to have on their bikes? Hah. Tow truck. Right now right this minute you need to go out and get tow truck insurance. Dont quibble about it cheapskate. Evidently there is a specific front brake cable connector JUST for the 1946 Chief. I had two other types that looked fine, lost them both on the road somewhere, I guess they didn't feel fine. Get the 46 if you have a 46. Mounting the front brake lever on the handlebars. Holey Moley. In its orginal postion it looks great on camera. But it is no where near the throttle handle and my fingers are not long enough to drag the ground so they wont reach it under any circumstances without letting go of the throttle. How did they do it in the old days? They never used it. Believe it or not extreme front braking is a modern invention. At best it was a hill holder back then. I wanted two rear view mirrors. Got them, nice clamp ons, rusted the 3rd day I had them. They wanted to go where the brake was. Ok not a big deal, but I also wanted that cool looking brace bar across the handlebars. Along with a horn button there aint enough room gang. How to fix it? Cheat. Took the right screw out of the horn button mounted the brake clamp over it. Figured out how to do this myself without the VI list. But the brake lever now rubs on the shoulder of the grip nut. Sigh. Carve out the holder, carve out the brake lever, make big spacers inside the clamp. It only rubs a bit Rear Brake. Did I
ever mention my war with the rear brake switch? Went through 3 of them,
3 different kinds. All broke in various ways. Finally took the full
cover from a simple switch I got from our vendors, went to the motorcycle
shop and bought a cheap dirt bike switch that looked like it. Been
on there for months. This may be the one. But my war just wasnt with the
switch or switch angle. It was with the spring from hell. The brake
switch spring is in front of the switch and goes up to a post that is used
by other big brake lever return spring. It has a "special" place on that
little post. Segregated right out the other springs playground. That should
give you a clue. You would think it a simple job, just put on the spring,
twang it a bit, done deal. I fought 3 springs to the death, before
I got one tough ol bugger that seemed about right. I am suspicious of
that spring and often sneak out to the bike at night to make sure it isnt
screwing up while I am not looking. The first time a similar spring acted
up, it pulled the entire interior brake switch assembly out of the housing
and dragged it on the freeway for its own amusement and sparks. I know
this because the police told me. See previously the rear brake light came
on when and where it felt like it. Kind of like the tail on a cat. It had
a mind of it's own. I never minded with it after a while and just use really
big arm signals.
The only other part
of the bike that took more effort to fix was
the new handlebars.
|
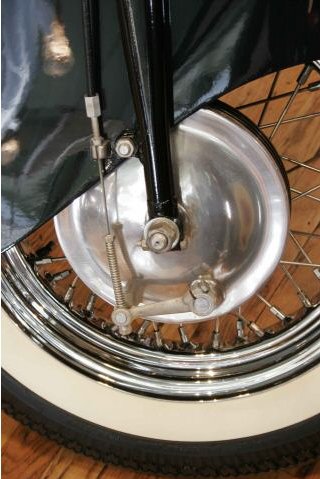
1946-only front brake cable setup
|
| I
got some new high risers. Threading the cables and wires through
those handlebars took me 6 hours. No joke. Finally had to solder
all the wire ends together and pull them through with a stouter wire. Then
wiggle force, coerce and finagle the cables in. Now the new cable
wires should have some new end blocks. How in the hell do these things
come apart??? Was afraid to post it on the list. So I just pounded
it on through wire tip and all until I saw how it worked. Looks like
I better call Starklite for new set of cables and block ends. This time
it went a little better. Now how did the Indian factory keep the
cable housing from just pulling out of the handle bars? Must be some
kind of special nut right? Oh no, you take the biggest, heaviest pair of
channel locks you got and a pair of vice grips, slide on the end tab, and
UNWIND that 1 gauge
wire a bit, just enough. 3 tries and a blood blister and a beer later.
Got it just right. Hey lets save 6 cents on a nut eh!
Some of us want to have authentic bikes and unwind that puppy. Most of
us would rather have it welded in place for life. 8 hours.
That is a tough job. But it was far from over. It would feel and look better (I think) if the handle bars are behind the neck tension adjuster, and I wont have to reach over or through the bars and brace to twist it. What I mean is towards the front of the bike. Actually explaining the position of the bars and that tension adjuster being in front of or behind it is like saying "yes it is not going to rain, or, no it is not going to rain". I had no idea the rubber mounts in the risers were made of petrified bowling ball material. After several VI list sessions, I finally got the old rubber ground out and the new rubber Permatexed in. It works just fine. I know you should have them specially heat bonded. Now one riser is just a hair farther forward than the other one. Its staying, the stretch is good for me. As I look back on all the parts I have ordered from our big 3 vendors, usually one at a time as I needed them, and adding the cost of shipping - it dawned on me. I should have just bought two Indians. After the last trip to the hardware store for stainless steel nuts, bolts, washers, metal straps, metal plates, etc - an up to the year total of $200 has just rung the cash register bell. I almost won a free trip to Hawaii. Just for this bike! Somewhere in the fine print it says that if you take off your risers - you need to disassemble the girder a bit. Might as well learn how to adjust a girder! More trips to VI and the books, and after several disassemblies and assemblies, not bad. Rides better than ever and got a lube job and new zerk fittings. ZERK FITTINGS! Mr. Zerk retired after Indian went into production. From the profits. There are hundreds of them on the bike. Under things, on things, between things, over things, and missing from things. They do a great job, I guess. Masses of grease packed into places where the sun wont shine, and in my normal exuberance - on my shoes, and on the floor, and did you know that molybdenum grease will literally spread exponentially on any surface to 100 times its normal size? Even my cat likes zerk fittings. No its not what you are thinking, however I have thought of it and I'll tell you why. I have a cat that can swat the only zirc fitting at hand for an oversized hole, 10 feet across the garage and under the rose bush. He really is quite talented. Believe it or not, there are some MORE zerk fittings you can ADD. One to the hubs of your wheels to mention. A spot that can only be accessed when the hub is just a pup. Otherwise, wishful thinking. Speaking of hubs,
and zerk fittings how is the back end doing?
|

Rebuilt ND 12V alternator
|
| Part
3
How about that rear end? Got to take it all apart from the front sprocket back. Might as well replace that 22 tooth with a 24. Kick starter is rubbing a hole in the inside of the chain cover and of course mandatorily scraping up the exhaust pipe. What were they thinking? Found I had a missing spacer at the outside edge of the kick starter shaft. This is no ordinary spacer! It is beveled to the circlip holding it, can be pressed in harder as the washer pushes out against it. Brilliant. That mismatch in distance out from the center of the bike is why the teeth of it were only catching 3/16s of the edge of the front kick start gear as well. Ordered a new one, voila, now I can really scrape the exhaust pipe raw with the kick starter pushed in where it should be. Screw it, banged the pipe down with a hammer to clearance. Now it looks just like all those other old Indians! Meanwhile back under the rear end after a stare down session with my rear brake spring. If you dont keep it intimidated it will act up. Oh, thats why the speedometer is going crazy. Its slipping off that knurled spacer. Press it back on. Would it stay? After a few days of post testing. Not a chance. With that huge 3/8s inch (thats 64,000 hexadecelcentimillimeters) gap between the speedo drive unit the brake hub, dont want to get too big a gap while beaching the housing on the knurling. Alas ther is not enough knurling to work. Back to VI. Drill a hole in the speedo housing, make a good dent in the knurled spacer with the drill bit (man that spacer is HARD), put in a set screw. That works. Why is the hub rubbing a groove ALL the way through the rivets holding the sprocket? Odd, must be missing a spacer in there? Sure as heck, right on the shoulder of that rear axle, inside the hub is nothing. Best get that special spacer from one of the vendors. Speedo fixed, spacer in, all the nuts and spacers lined up with the moon and stars, and forgot about the rivets while I was staring at the fact the not all of the rear hub nuts are bolts. Some are nuts on studs. One of them is very different - and it fits just fine. Did I mention this before? I must have. Hokay all back apart, time to drill out the rivets and put new ones in. I could write a book how I did this over a hot campfire and an anvil, but I took it to a shop and had them drill them out and smack those babies in with a 10 ton press. Done deal. Putting the rear back together again. Just how do you square the rear end on this thing? Tons of ideas from VI, lines on the floor, bars on the floor, strings from the seat post, you name it. I did them all. The test? See if you can take your hands off the handle bars, while in neutral, coasting SLOWY down a hill. Which ever way it pulls is what you adjust. Whew just about done. Sitting on the floor behind the bike I smell gas. There is a small puddle on the floor. Just why does gas always want to leak out of that Linkert? The one on the lawnmower doesn't...... Got a new Cotten float, a work of art. It should work, it does work. Except when my carb simply wants to puke gas on the ground. I could rebuild the carb, be a traditionalist. Might even make it run better and start easier. Wouldnt that be nice. Back to the VI list. Whoa, not cheap getting one rebuilt and the time. Would be out of commission for a while. Looks like Jim Mosher has a CV carb kit. After begging and whining long enough he graciously sent me an entire kit 41mm Keihin CV carb and all, instead of making me buy a mystery one off of eBay. It was worth every dime. Put it on, and literally kicked it over on the second kick. It idled the best I ever heard on the bike. It ran great, the top end power was REALLY discovered with this carb. Tuning and maintenance zilch. I never touch it. I know what a good running carb feels like. I had Triumph motorcycles. The ones that you had to "tickle" enough to get gas to leak out of it before it would start (this is from the manual). The Linkert is just fine. But the CV is great and it delivers. At about this time I am hearing some clacking and clicking out the pushrod area. Okay. Time to learn how to pull off the oil pump and cam cover. How hard could it be? Buy your gaskets before you even think about this. The front pushrod was slapping around. Got a few different over sizes and lengths (and a King clutch kit) from Ed Glasgow and, it simply slipped in like it belonged there. That was easy. What was that article about the hot cams that weren't Bonnevilles. Back to VI. They are called Ollie cams. I have no idea why. Supposed to put out the same effect as a Bonne or nearly so. Jim Mosher had an interesting offer. He'd get them, index them to my gears and put them on for a reasonable price. But "how much slop is there in the back gear". I hate it when they ask stuff like that. Finally resorted to using spark plug gauges behind the gear, putting on the gear, putting on the cover, and seeing if I could wiggle the gear. 7 thousandths. So Jim added that to the cam set up while he built it up! He also looked over my peened rocker ends and made them ship shape. How does it run with a CV carb, Ollie cams and stock lifters and springs? (yah, yah I'll get the Bonne lifter and Scout springs, I swear). First, it clacks a lot. Those cams are loud, but there is a certain music to them. Kind of like watching that show "STOMP". After the shock of the noise at first, I took them for a ride. OH MY GOSH. This thing runs. It runs much better than it did with stock cams! You can HEAR the engine sucking in a lot more air. You can FEEL it working. It is quick, has a hard pulling top end that revs until the valves float (my usual shifting point ;-). That noise is simply horsepower waiting to get out. I can't hear a thing now. |

With the electric starter, a new home for the battery must be found.
In addition to King clutch kits, Ed Glasgow also does bolt kits and a ton of other neat parts. Contact Ed through his website |
| part
4
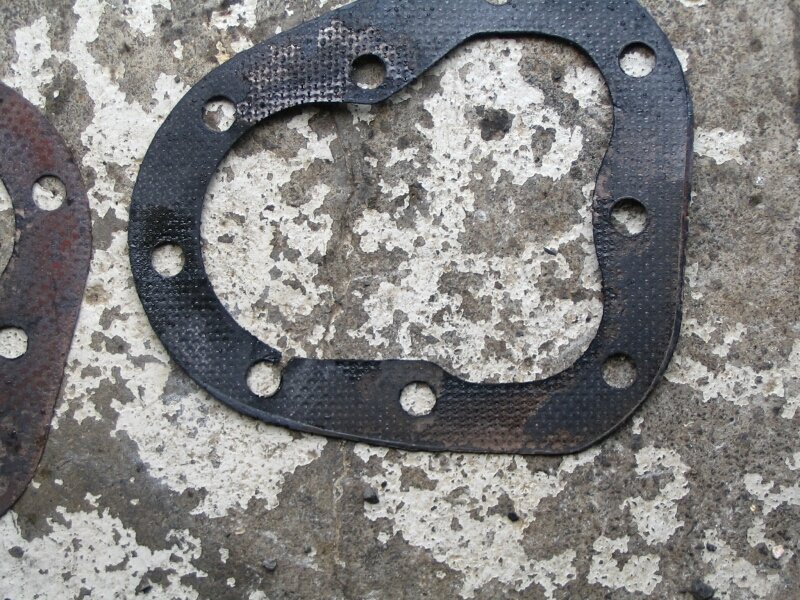
The new CV was doing ok, but one day, it caught the old puking disease my original had. Gas wouldnt just leak, it POURED on the ground. Then on a back road, trying to start it while it was leaking it caught fire. Bad enough, but I just splurged my sons' inheritance on a new set of 5 gallon gas tanks from Matt Blake, with a new paint job. There went the paint job. Called Mosher to see what he suggests, and he ordered the unit back to him. Found out it had a cracked vacuum diaphragm. A little bitty thing, but sure can cause grief. Got it fixed and Jim threw in some extra work on it. Runs perfectly. New paint job next week. You know, it was my fault. Why try to start a bike with a leaking carb and fuel all over the place. Dumbass award extraordinaire. Almost happened exactly with my Linkert a few months before, except the Linkert was backfiring down the pipes. Or is that front firing? (the rain thing). That time I was trying to take Cottens often given advice about finding intake manifold leaks. Darn if he wasnt right. That trip was fraught with failure. Earlier when we were trying to go the full route around Oahu, I let the bike out of my sight while a good friend put some gas in it. A half hour later, on a back road close to home, a well known but isolated shortcut and a fantastic view of the island . Boy that sure is a small gas tank, how much mileage do you get? Small gas tank. Like the one that says OIL on it? Oh. What to do? Get the old foot push from his bike home? He wouldnt do it, was afraid me and rightly so. Well, I figured it ran this far, lets kick it over and do as much coasting as possible, most of the 9 miles is down hill. Got it home, pleaded my case on VI and no big deal! Really! Everyone said, flush it with some more oil, another change or two and they were right. Runs fine. Luckily that oil tank was nearly full - 2 down from the top like it says in the book. I also changed my oil filter. I got an oil filter from Jessup. Bolts up to the front of the engine. Had to make my own tubes. Could write a novel about tube bending and the 4 trips to the hardware store, the stories, the lies and the stares, but in the end, got them just right. That oil filter works just fine. I use a car model and the bike squirts oil so hard I have to aim the tube well into the oil tank. Speaking of oil, I was getting some mysterious oil deposits on my back cylinder head. There was a strange, small, discoloring oil leak on my rear head. Right around the "impossible" bolt. You know which one I mean. I bought a special tool and tightened the bejesus out of it, possibly tilting the entire motorcycle engine back a bit more than designed. Still leaked. Dang. What could it be. Went to VI, Mike Breeding said "probably a head gasket". He doesn't talk a lot, but he does say a lot with those few words. It took a while but I finally found the source. A pinhole head gasket leak on the back of the FRONT cylinder. Blowing a tidy mist for all to see across the back fins. It was under the only bolt on the head that is a different size from the rest. The top engine mount bolt. |
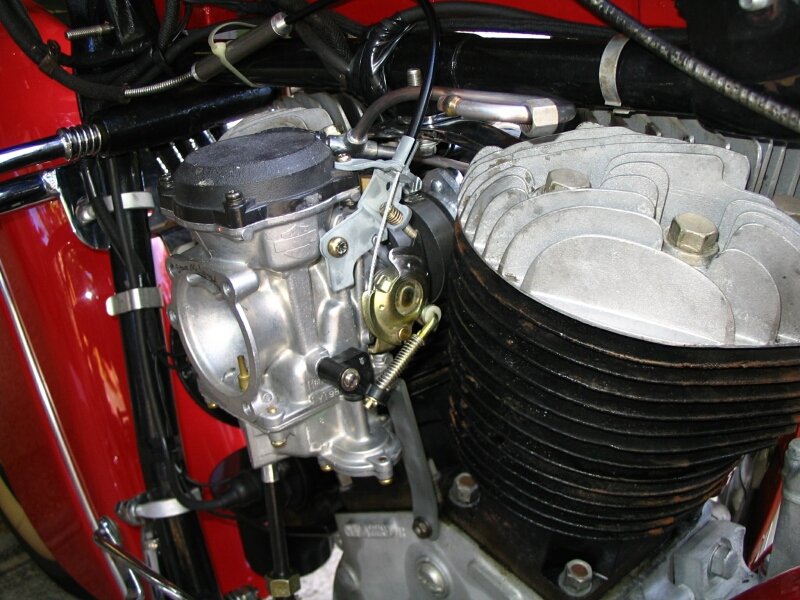
Jim Mosher's Keihin CV kit installed More CV info - and tons
of other useful Indian tech info! - on Jim's website
|
|
This was my first experience in removing the gas tanks. Oh, oh, oh. I should have got a helper. Oil dripping everywhere. What we need is a shut off valve FOR THE OIL. Got them OFF. Now to get that engine top brace off. Outside bolt, easy. Who on earth designed that inside bolt placement to keep the top clamp on? Took a half hour of moving a box wrench one decicentimillimeter at a time. The heads popped off easy, and boy could you see where the head gasket blew. Now that I think about it, I was hearing it for some time too. I wanted to ride pretty soon, so I fired off a call to Kiwi and wound up with a set of James headgaskets, the next day. We are in Hawaii remember? How do they do that? Now the James gaskets are different. They have a sandwich of rubbery stuff and metal held together with outside rivets. Plop them right on. Think so? You have to remove the old gaskets and get those surfaces clean. Somebody put some asbestos looking gaskets on with some red permatex looking stuff and it was petrified. It took 2 hours to clean that stuff off the heads, and an hour to get it off the cylinders. Someone owes me!!! Some people swear by James gaskets, some at them. So far after 1,000 miles they are doing a great job. And the retorqueing a couple of times after were never more than a couple of pounds on any bolt. Torquing the heads on a '46 Chief. There are 3 nasty bolts to try and torque. The front of the front head, the one next to it and the rear "impossible" bolt. And you know those two top brace head bolts are brother buggers too. Well we've just about worked our way 360 degrees the way around the Indian by now. I topped off my pride and joy with a fancy chummy seat, and specatacular matching bags from Heathers Leathers. Cost more than my first 5 motorcycles. It is amazing work. Lots of fringe, chocolate brown and that incredible red Indian paint job. Not too much chrome. Just right. Except I had to take Stark's advice and reverse my rear crash bars - swap sides to get the bags on. Not bad, except your right heel hits the bar when you kick start it sometimes. And you can't open the toolbox door. Only holds one beer anyway. Time for show and tell. I took my wonder of motorcycledom to my girlfriend's ex-mother in law's house. Don't even ask about what you just read, it's just the way it is. The family came out and oooh'd and aaaah'd and Roberta came up to me and said proudly, loudly and with great emotion - in front of everyone and the neighbors "It looks just like a pony!!!" Just like a pony??????? I was about to turn purple, launch into tirade about the wonders of the Indian motorcycle and when I turned around to look at it.... damn if she wasn't right. All that leather and concho's and 8" fringe....It does look a little like a circus pony, and the fact that she loves circus ponies - was quite the compliment. Come on Ol' Paint, let's hit the sunset. Isn't there an easier way to start this bike in front of a bunch of people? Maybe there is. |

Pony leather!
|
| Part
5
Now the real, real interesting part. I have an electric starter for my Chief. It is a brilliantly simply design by Tom Fusco. Alas his didn't quite have what I was looking for when I was in the market. Then on an obscure Ebay site, in German, was the same type of electric starter kit - but with a kick starter on the outside of it! Now we are talking. Christian Timmermann borrowed Tom's design and put the trusty, godforsaken, kickstarter back into the equation. Had a few problems getting it to fit. My Chief was made 3/16's farther apart from the kickstarter shaft to the tranny shaft, than "anyone" has ever seen before. This messed up the precisely drilled holes and sprague gear alignment Chris had settled on for the kit. He has since redesigned that part. In the mean time I got a back up piece from Kiwi, a kickstart shaft that can be adjusted for various distances. What did it all cost? More than my chocolate brown leather chummie seat and matching bags with fringe and conchos. But, a Harley rider has that much in his yearly shop fees. Does it work? It would if I had 12 volts to push that Sportster starter. Sigh. I guess 12 volt is pretty good all round. Was recommended to a gentleman in Florida who has a special SMALL Alternator, Jim Dingess - with an excited post, the alternator has it not Jim. He has them rebuilt by the Nippon Denso guys and it simply bolted right up to my frame and existing drive belt with no effort. I had to use his little adaptor. This small little half clamp that goes around the seat post is extremely simple. However it is made out of stainless steel plated in platinum and covered in gold. I assume this from the price of it. Alternator was cheap! 12 volt. Boy does it honk that little 6 volt horn. That's a keeper. The 12v headlight actually shines light on the road. And the Alternator juices the battery at a lower rpm than the generator, and has a nice electronic regulator in it that feeds juice as it's needed. In fact it will run the bike without the battery at all. People have been known to push start the bike with no battery and have this little jewel do the job. In fact this alternator DOES everything everyone on VI said it WOULDN'T do. While we are enjoying the benfits of 12 volt, we have to move the battery. That's where the new starter is sitting now. Get a smaller glassmat (AGM) battery (AGM is the ONLY kind to buy) from a Vrod, put it in a Indian battery box repop, turn it sideways and bolt it to the old battery frame and inside fender mounts with some aluminum L metal from the hardware store. Voila. It doesn't stick out any farther than the tool box with the beer in it! Whooo hooo. let's hit the button and start this pony ride. What button? Isn't there a button to push? Nope, the kit didn't quite get that refined yet, but there is a nice diagram of how to make one that fits under the horn button. To heck with it, I hotwired it for the moment. By gosh it works! It really works! It really works great! And the kick start is even better than the original. It's smoother, with more teeth in the gears, a longer shank - and it misses my exhaust pipe. Now I guess I'll have to buy a pretty one..... |
More
about Tom Fusco's electric
starter in the 2005 VI Xmas Special
|
| Part
final
Well she is quite
the bike. Her name is Sioux. My girlfriend decided since it was and Indian
and all the animals in my family had a middle name of SUE (you've probably
stopped asking questions
Gone are the days of gambling and adventure - gambling just trying to see if it will start - and - leave me in good enough physical condition to go to work. The adventure of getting it home again. No carb fiddling, maybe a little choke here and there. No kicking. That starter SPINS the engine hard and fast. It would probably start even if I didn't have the key on. Think I'll ride Ol' Sioux the wonder pony around Honolulu for while tonight. |

Sioux |
|
|
|
|